Friday, September 23, 2022

Illustrating Mushrooms

Wild mushrooms in the woods.

Me photographing and picking mushrooms (photo by Jeanne Gren)
Yellow-cap Collybia (Gymnopus subsulphureus)

Last Saturday I took a workshop with Margaret Saylor, who specializes in painting mushrooms, at Oak Spring Gardens. In the morning, the class foraged around the fields and woods on the grounds surrounding our classroom to find our material. Fortunately, it has been a wet summer, and there was a wealth of unusual fungi to find. The two photos above are the same mushroom, the yellow color doesn't show up as much in the first.


My mushroom sketches from the class

I was hoping to find something colorful, and was not disappointed. Identifying the mushrooms correctly is another matter! Even with the help of field guides, mushrooms have so many variations in form and color, it's very difficult to make a definite identification. The cluster of yellow-capped ones I picked for my sketch on the far right I believe may be the Yellow-capped Collybia (Gymnopus subsulphureus), at least that is the closest resemblance I could find.

The middle sketch was started in situ while squatting near an innoculated log, but I couldn't read the label so I have no idea what species it is. It's definetly not an oyster mushroom, perhaps a shiitake? A huge slug was eating it, so I wasn't about to pick that one.

 From previous experience I recognized the mushroom sketched on the left  as a stinkhorn right away--I've come across this type of fungus in my garden a few times before, growing from spores in the commercial mulch I buy. The ones I've come across before are Mutinus elegans, a species which has a shiny brown cap on a spongy orange stem that resembles the male organ. Some folks call it the dog's prick stinkhorn.


Perhaps a squid stinkhorn? (Pseudocolus fusiformis)


Some one else in the class had picked this stinkhorn mushroom and brought it in, but found the smell of it so unpleasant, she couldn't stand being near it long enough to sketch it. Fortunately for me, my nose was completely stuffed up on that day and I couldn't smell a thing, so it was perfect for me--although after a while of sketching it, the smell did start to break through to even my stuffy nose, but I didn't find it nasty, more sort of medicinal, but that was me... I wish I could have seen the stinkhorn when it was intact, to determine if it is what I suspect, the Stinky squid stinkhorn (Pseudocolus fusiformis). 

The "egg" from which the fungus sprouts is larger and more irregular in shape on this one than the Mutinus elegans ones I've seen in my garden. These fungi disintegrate so quickly, it was time to dispose of it at the end of the class. The workshop was great fun for all, but over much too soon. I did manage to bring home a few specimens that I though might keep a bit longer. I worked on these sketches during the past few days.


Among the specimens I brought back were a couple of Hemlock Polypores (Ganoderma tsuga) that had dried nicely. One specimen in particular I though was spectacular, an accretion of mushrooms that looked so cool, I just had to sketch it!


My collection of Hemlock Polypores (Ganoderma tsuga)

My sketch of the weirdly-shaped Hemlock Polypores

I love the bright colors of the one stem with the whitish cap and the wine-red lateral stems with the incrustations of earth and mulch! I now have three of these weird fungi in my collection--they dry really well and last a long time, although the bright colors may fade eventually.


Two-color Boletes.

Another colorful mushroom I found were these small Two-colored Boletes (Baorangia bicolor) right by the path through the woods. I've seen these before, but didn't know what they were until I checked with my field guide. I included them in my sketchbook page with the other Hemlock Polypore. I wish I'd been able to sketch them when they were fresher and much brighter in color.


White colored mushrooms (Leucoagaricus americanus?)

The mushrooms above I haven't been able to identify with any certainty--these could be two different species or the same species at different stages of development. Some mushroom caps start out being conical (convex) and the caps eventually grow concave. Here are some photos of these.


Reddening Lepiota  (Leucoagaricus americanus)? early stage.
Same species, more mature stage.


The shagginess of the cap in these mushrooms leads me to believe these may be the Reddening Lepiota (Leucoagaricus americanus) I sketched on the left. The other mushroom sketched on the right (two views) seems to have a smoother cap and more delicate gills, it could be the same species but more likely it's something else called the Fawn or Deer mushroom (Pluteus cervinus).


Margaret Saylor's mushroom on vellum.


I leave you with this exquisite small painting that our instructor, Margaret Saylor, was working on. It's watercolor on vellum using classic  dry brush techniques--lovely work!

It's raining today, and I'm hoping this will bring forth a whole lot of fresh mushrooms sprouting in the woods--can't wait to see what else is out there to be discovered!

Monday, September 12, 2022

Late Summer Works

Iris 'Afternoon Delight' watercolor in progress


Summer is ending and it's just now that I'm getting around to painting the iris I fell in love with at Blandy Farm this past spring! Its colors are such a stunning combination, I couldn't resist painting it, even though I have to work from photos. When I visited Blandy last week I found that their iris garden is being re-designed and will be situated in a different location--there were only a few weeds and beat-up irises left where 'Afternoon Delight' and the others had grown. I wanted to buy this variety for my garden, and had intended to beg a rhizome or two from Blandy, but I've finally found a source for this variety, bred in the 1980's.

 I started digging up one of my iris beds earlier this week--time to separate the overcrowded rhizomes--but have been forced to take a break due to some dental surgery, after which I'm required to rest for a few days. Too bad, with the recent rainy spell the soil is perfect for being worked, but it will have to wait.


Autumn Joy Sedum in Herb's bed.


My garden needs a lot of work this fall: most of the irises and many of my spring-blooming bubs such as the daffodils and grape hyacinths need to be separated and re-planted. Ditto for the Spanish bluebells (Hyacinthoides) at the foot of the Zelkova tree. Many of my flower beds need to be re-edged and re-worked too.

The 'Longwood Blue' Caryopteris shrubs that I'd planted some five or six years ago died back a lot this past winter, and despite pruning and fertilizing, they haven't bloomed very well this summer. A few new plants sprouted from seeds have grown under these, and I'll probably dig and replant those, to see if I can restore that bed to its former glory.


Skimpy flowers on Caryopteris 'Longwood Blue' this year.

The back yard from the west side.


 I'm planning to consolidate the bed with the Caryopteris and the one around the Japanese maple 'Amber Ghost' into one bed, incorporating the new 'Texas White' redbud I put in this past spring. This expanded bed will need some new under plantings--perfect for some of those surplus spring bulbs!


Beautyberry 'Early Amethyst'

The 'Early Amethyst' Beautyberry bushes are displaying their lovely purple berries at the moment. The Seven Son Flower tree bloomed profusely this year, and continues to bloom well past its usual time. Normally, by the end of August its flowers are starting to fade, but it seems to have enjoyed the very wet summer, as has the honey locust tree (behind the Beautyberry).


The Seven Son Flower tree.

Ceanothus delileanus 'Gloire de Versailles'

The Ceanothus 'Gloire de Versailles' protected with a tomato cage has finally grown enough to produce some blooms. Other annuals I'd planted with great hopes haven't produced much--the zinnias this year were a great disappointment, a few puny plants and no flowers. The Clary sage has not developed any flower spikes either, neither has the one Canna and the Hedychiums, and I fear it may be getting to be too late in the year for them to develop. The front bed with the impatiens and coleus grew fairly well, but did not present the coverage I'd hoped for.

Now the dogwood leaves are starting to bronze and soon the Equinox and the fall-blooming sequence will begin.


Pages from my botanical journal: Hazelnut and Beautyberry branches.


Thursday, August 25, 2022

The Dog Days that Weren't

Great Blue Lobelia (Lobelia syphillitica) in white.


August began with a couple of severe thunderstorms which brought a lot of rain to our region. After the second storm, the weather cooled down, as the jet stream dipped way down into the south. As a result, the usual Dog Days of summer have been considerably cooler than normal, almost autumn-like. My garden is loving it!


East bed with great blue Lobelias
Great blue Lobelias in the east bed.


The Great Blue Lobelia planted many years ago has multiplied amazingly in the intervening years, seeding itself throughout the entire bed to the east of the house. This year I noticed there are a couple of plants with white flowers among the throng--I presume they are either sports or albinos of the parent plant--in any case, they are lovely!


Hybrid lobelia 'Starship Rose'


The hummingbirds like the lobelias so much that this spring I ordered a new one, a hybrid called 'Starship Rose' which has turned out to be a winner. Now that I know it will do well here, I'll probably buy a few more plants next year. I want a huge clump of this one!


The back yard viewed from Herb's bed

The Sedum 'Autumn Joy' is getting ready for its September show--soon the Muhly grass nearby will put forth its airy plumes, and the swamp sunflowers blossoms for a gorgeous display. This year the deer haven't eaten the flowers of my wild sunflowers (Helianthus annuus) growing around my veggie patch and in the badlands, for some unfathomable reason.


Wild sunflowers (Helianthus annuus) in the Badlands
 

I've been spraying the black-eyed Susans (Rudbeckias) and the Clematis 'True Love' with garlic spray so the deer wouldn't eat them. But they took their revenge by devouring some pink Portulaca I'd planted in front. In the photo below the Portulaca was starting to cover the bed, a week later it looked gorgeous, and then the deer ate it down to nothing! Such is the heartbreak of gardening...


Pink Portulaca with Clematis 'True Love'
The long bed from the back with a Beautyberry shrub in front.
The long island bed.
Black-eyed Susans and Boutelouia 'Blonde Ambition' grass.

The long island bed is more colorful this year with the black-eyed Susans protected. The Lambs' ears is spreading nicely. This year I planted some balsam seeds  (Impatiens balsamina) in the bare spots. It took a while for them to sprout and get established, but they're finally starting to bloom. Hopefully they will re-seed themselves for next year. I used to have this plant in my garden in Columbia before we moved here, and it made a wonderful display.


Balsam (Impatiens balsamina)

One cool morning walking in the back near the woods, I spotted a tiny bunny under my witchhazel tree. He was so cute, I ran back to the house to call Herb to come see it, but by the time we got back to the spot, he was gone! Mama rabbit had probably parked him there while she fed, and she came back shortly to fetch her baby. Good thing I got a couple of photos of him before he vanished!


Micro-bunny.
Black Swallowtail butterfly caterpillar.


Another interesting sighting were some green and black caterpillars on my fennel plants--these are the larva of the black swallowtail butterflies. I was hoping to see some of the pupae, but I think the birds may have eaten the caterpillars before they had a chance to pupate. There doesn't seem to be a lack of black swallowtails in my yard, so a few must have made it. I see more and more butterflies here every year--my garden is definitely attracting more pollinators.


The front walk

Yellow Hibiscus

This summer my hanging baskets on the porch haven't been as successful as I hoped for, but the front walk, lined with potted plants, is as colorful as ever. Those scented white Petunias are a great new addition!

My potted plant collection on the back deck continues to increase, as you can see.


Plants on the back deck.
Back deck on the other side of the door.

I can't complain about this growing season, the weather has been very kind to my garden thus far. Yet oddly enough, the southern slender ladies tresses orchids that bloomed so profusely last summer, haven't made an appearance at all. Who knows why, these native orchids are so quirky!

Saturday, August 20, 2022

Painting a Pumpkin

Pumpkin 'Galeux d'Eysines' watercolor, 14.5" h x 21"w.


I've been working on a painting of this variety of pumpkin since last fall, for a show "The Botanical Gourmet" that I've been planning for the Botanical Art Society of the National Capital Region (BASNCR) this coming November. My painting started out as just the ripe pumpkin, but eventually, it became more and more involved. In order to tell the story of this particular pumpkin, I felt that I needed to show more of the vine that produces this lovely, warty pumpkin, as well as what its interior holds.

What follows is the gradual progression of steps that it took to get the painting to its finish.


Galeux d'Eysines pumpkin - Stage 1


The first stage was completed in late November or early December of 2021. I then cut the pumpkin, saved one piece, and cooked the rest. The pumpkin had sat around on my drawing table for way too long, and being so old, it was not very palatable--I used some to make pumpkin bread, so that it could be tastier.


Galeux d'Eysines pumpkin - Stage 2


I worked on the second stage through January of this year, as quickly as possible, since the cut piece was decaying rapidly. At this point, I decided the painting needed something more, to tie in the two elements of the composition--one way to make it more dynamic would be to add the vine and depict the leaves and flowers of Galeux d'Eysines. I looked on-line for photos that I might be able to use, but found none--the only way to really study the leaves and flowers would be to grow the pumpkin myself. 

I could have saved some of the seeds from the pumpkin I had and planted them, but open-pollinated pumpkins from the field might not yield the same exact variety that I was looking for. It was wiser to buy some seeds that were sure to be the pure Galeux d'Eysines strain. I found that Johnny's Seeds offered some, and I ordered them.

Waiting until after the last frost, I planted my pumpkin seeds in a grow bag, and they sprouted within a week. It has been fascinating to see the process: the vine growing and flowering, observing the differences between the male and female flowers. The male flowers seem to outnumber the female by about a twelve to one ratio--nature allocates its resources wisely, so that the plant will invest most of its energy into producing fruit and seed.


Galeux d'Eysines pumpkin - Stage 3


As soon as my pumpkin vine had enough leaves and some male flowers, I began sketching them. I laid tracing paper over my painting and drew in the vine with leaves and male flowers, weaving these along lines that would move the eye across the painting.


Galeux d'Eysines pumpkin - Stage 4


 After painting the upper vine, flowers and growing tip, I needed to find a way to bring the eye down and around the pumpkin and the cut piece, and had to take a bold step--to cut into an already painted segment of both in order to insert a piece of vine with a leaf in between these two main elements. This took a lot of lifting and scrubbing, to remove the color underneath. I was not able to remove all of the color, but hoped to be able to paint over it enough to not be too noticeable.

Once this was done, I had to wait another couple of weeks for a female flower to come along. The first one appeared on the vine during a very hot spell, and dried up before it had a chance to develop, so I waited for another one.

Eventually, one female flower developed sufficiently to open. I took photos of both the bud and the next day, the flower--these flowers only last one day. A few days later, the pumpkin began to grow larger, indicating it had been pollinated.


Female flower bud
Female flower opens

Pumpkin begins to grow.

It was so exciting to see this fascinating process take place from day to day! But about a week later, I noticed that the little pumpkin was not growing, and when I went to check, saw that the vine stem had been chewed--squash borers had pierced the stem! Very disappointed, I opened up the stem to clean out any larva feeding there, and buried the part of the stem that had not been eaten, trying to get the vine to re-root.

It was too late to save that portion of the vine with the tiny pumpkin, but it seems the borers didn't get to the main stem of my vine, so I may yet have a chance to grow another pumpkin before the end of the season. But, in any case, I had all the pieces I needed to complete my painting, which you see here.


Galeux d'Eysines Pumpkin, finished painting.


The last step was to add some subtle shadows to let the pumpkin and the cut piece "sit" on the ground. This has probably been one of the most complex compositions I've done so far, involving so many different processes, requiring both gardening and artistic skills, and lots of patience!

Wednesday, August 10, 2022

Meeting Mushrooms

Charlie Aller leading the mushroom identification class.


Last Sunday I drove down to Covesville, VA for a mushroom identification class "Basic Skills for Meeting Mushrooms," led by local mycologist Charlie Aller. We met at Hechyion Orchards on a hot and sunny morning. After a brief intro on how and where mushrooms grow, the different forms and shapes of the amazing fungi family, and the substrates upon which they grow, we set out to find some on the forested hillsides of the farm.


Turkeytail mushrooms (Trametes versicolor)
Medicinal mushrooms growing on a fallen log.

Our first finds were two groups of bracket fungi growing on fallen logs. We had discussed that one of the main distinguishing characteristics of mushrooms that holds clues to their species is that one group grows on wood, and another group on soil as a substrate. This is the medium in which the mushroom mycelium grows--the mushrooms themselves are actually the fruiting bodies of this thread-like structure that breaks down the organic material in the wood or soil with the help of bacteria and enzymes.

The turkey tail mushroom (Trametes  versicolor) has bands of different colors, and is a common sight in forests. These type of mushrooms are referred to as polypores. The other bracket fungi (which name escaped me) has been found to have medicinal properties.


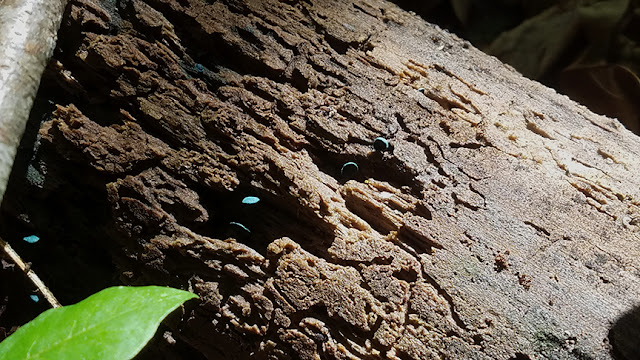
Green elfcup (Chlorociboria aeruginascens)

Green elfcup


An unusual fungi I'd never seen before was the green elfcup (Chlorociboria aeruginascens)--these tiny cups are a lovely blue-green and seldom fruit--the mycelium tends to stain the wood it colonizes, a phenomenon called spalting.


Golden Thread Cordyceps (Tolypocladium ophioglossoides)

Charlie digs for truffles under the Golden Thread Cordyceps.
Deer ruffle (Elaphomyces sp.) under Golden thread Cordyceps.

Another fascinating find was the Golden Thread Cordyceps (it's no longer classified in this genus), a darkish, club-headed fungus that has a gold-colored thread at its base, and parasitizes an inedible truffle called a deer truffle. Charlie dug under the Cordyceps to find a small truffle below, and slit it open, to show us the white spores inside.


Fungus parasitizing a beetle.

Speaking of parasitic fungi, Charlie also found what looked to me like a few fibers of ordinary mycelium growing on a pine log, but he spotted a beetle underneath it that was in the process of being consumed by this particular fungus. These types of fungi are known as entomopathogenic--nature is at times much stranger than we realize!


Cinnabar chanterelle (Cantharellus cinnabarinus)

I've seen these tiny orange-colored mushrooms before, and was surprised to learn that they were
Cinnabar chanterelles--they are edible, but according to Charlie, not the tastiest of the chanterelles, and so tiny they are hardly worth collecting. Unfortunately, we didn't come across any chanterelles of eating size. One has to look out for false chanterelles, which look very similar to the real ones, but are poisonous.


Reishi mushrooms on a trunk (Ganoderma lucidum)

As we worked our way up a hill, our next finds were some very large Reishi mushrooms growing on an old oak at the top. Charlie could observe the spores being released under the caps. Someone brought an orange-capped mushroom they'd found, which he identified as an Amanita flavoconia (in Charlie's hand in the first photo on this post), AKA yellow patches mushroom.


Giant Coker's Amanita (Amanita cokeri)

One lady found this giant classic-shaped mushroom, Coker's Amanita, on the hill. I learned that there are a few members of the Amanita genus that are edible, though most are poisonous, some deadly. Charlie explained that the danger with toxic mushrooms is that not only will they cause a lot of intestinal distress when ingested, but when the chemical compounds in these reach the liver, the liver converts them into an even more toxic form of chemicals that can cause organ failure very quickly. There are a few antidotes, but he emphasized that no one should ever eat a mushroom they've not identified correctly. Even then some people can have allergic reactions to normally edible mushrooms, so it's wise to eat only a little the first time, to test it on yourself.


Violet-grey bolete (Tylopilus plumbeoviolaceus)

There were a few other mushrooms found, but the last one I photographed was this beautiful specimen of the violet-grey bolete--such a lovely color! It's not edible, though, it's very bitter. It was getting very hot and we were well past the time allotted when our sweaty group finally headed back to the farm for a wrap-up. Charlie answered more questions and announced the following weekend's workshop on growing mushrooms. Much as I would have loved to do this one, after two Sundays with a lot of driving, I really am not up to making the drive there one more time--maybe next year.


Pencil sketches of my mushroom specimens.


I was able to bring home a few specimens so that I could depict them later on. I did this colored pencil drawing of these two the next day when I was fresher. The Reishi mushroom specimen is fascinating because it has a lateral stem--most from this variety grow stemless, directly on the tree trunks, but they can also have this form. I love the colors of both mushrooms, which are so evanescent. 

Now that I know a bit more about mushrooms, I plan to do some of my own mushroom forays closer to home to see what I can find--stay tuned!