Wednesday, September 26, 2018

Plein Air in the Shenandoah Valley

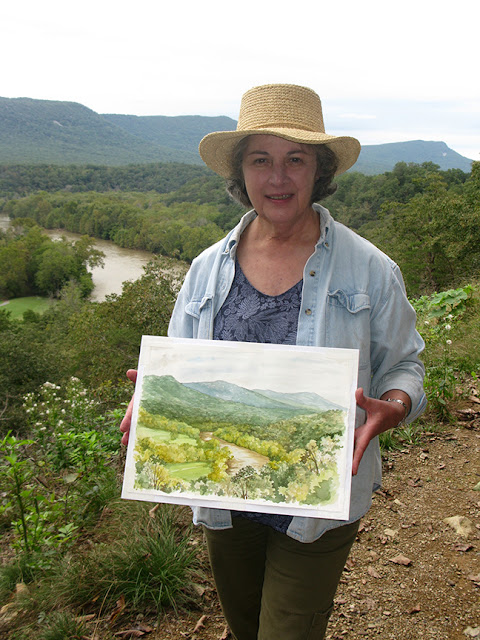
The Shenandoah River from Culler Overlook, watercolor, 10" x 14"

This past Saturday was the Plein Air Paint Day organized by Art in the Valley Gallery in Front Royal. The event coincided with the Annual National Public Lands Day, so everyone could enter the Shenandoah River State Park without paying the usual entry fee. This was a perfect opportunity for me, since I'd yet to visit this state park some five miles south of our town.

It was drizzling lightly when I woke up, and I was worried that our plein air day would get rained out, but the forecast didn't call for rain, just cloudy and overcast. So I packed up my gear in the car, made a sandwich for lunch and headed down to the gallery for our check-in. The gallery owners and staff are so nice! They had coffee, tea and scones to munch on at the gallery, and they had prepared goodie bags for all of us artists with water and snacks to take with us.

I arrived at the State Park and proceeded to Culler Overlook, which I'd been told gave the best panoramic views of the river. The view didn't disappoint--the wide bend of the river here reminded me a bit of the famous view of the Chama River in New Mexico, except that our hills here are covered with greenery, and show little of the underlying rock.

Two painters were already standing at the overlook--one gentleman had his painting well under way, and I recognized the other gentleman as Armand Cabrera, whom I'd met in the gallery at one of the opening receptions. Armand had not started on his canvas yet. I figured it might be a little too crowded with three of us there, so I walked down the trail leading below and found a nice spot under the shelter of some trees, just below the boardwalk--perfect!

I went back to my car and brought my gear and chair down. My working surface was relatively small--one quarter of a watercolor sheet, so I decided to paint only one side of the bend of river, to simplify the composition, and that worked.

After about an hour or so, another painter came down to the same spot to join me. I'd met Laura at the gallery before, but had forgotten her name. She told me she'd started blocking in the composition for her oil painting the day before, and set up behind me. Unfortunately, she seemed to be using turpentine (yuck!) rather than the less vapor-laden turpenoid and the fumes wafting down weren't pleasant. I tried my best to ignore it--thank heaven we were outdoors, and I could get up and walk around a bit to get away from it when it became too much.

After a while a young man showed up, who introduced himself as Casey and told us he was working with the gallery to take photos of the artists during the event. We obliged him by carrying on while he took his photos. Around twelve-thirty I took my lunch break, drove down to the visitor's center to use the bathroom and came back to eat my sandwich.

As the afternoon wore on, Laura and I chatted and I felt comfortable enough to tell her that she should ditch the turpentine because of its health hazards, and use turpenoid instead, with gloves on her hands to keep from absorbing toxins through her skin (she was picking up a lot of paint and turpentine on her hands). All these useful things I learned from my previous association with the Mid-Atlantic Plein Air Painters Association (MAPAPA), bless them!

The one good thing about having a cloudy day was that the light stayed consistent throughout the day, allowing for plenty of time to work on our paintings. It rained all of the next day-- almost an inch of rain-- so we were very lucky to have had the plein air painting on Saturday after all.

The paintings will be on exhibit at the gallery starting Oct. 12--can't wait to see what everyone else came up with!


Friday, September 21, 2018

Presage of Fall


Hardy Begonias

Another very rainy spell brought almost five inches to our area this past weekend. The welcome cooling was a presage of the fall equinox rapidly approaching. Other signs are present in my yard as well.

Hummingbird Clearwing Moth caterpillar?

I noticed that something was eating the leaves of the lovely Viburnum 'Brandywine' and found the culprit--a caterpillar I've never seen before. After consulting an insect identification site I think this may be a Hummingbird Clearwing Moth caterpillar. The coloring is a bit different than the photos on this site, but the small spots on the sides are identical, and we have seen these moths flying around our yard, so it's likely this is one. My first impulse was to get rid of it, but since this is part of the moth's life cycle, I don't mind sacrificing my Viburnum leaves for its sake. Butterflies and insects are, after all, part of the balance in a garden.

 
Beetles on Hoary Mountain Mint (Pycnanthemum incanum)

Some are nuisances, like the milkweed beetles which feed on the seed pods of the Butterfly Weed (Asclepias tuberosa) but are also appearing on other plants such as the native Hoary Mountain Mint. I read that these beetles a not a threat to the plants except for its seeds, so I'll probably just pull off the seed pods and see if that doesn't get rid of the beetles.


Seed pods of Butterfly Weed (Asclepias tuberosa) covered with Beetles

Other fall-bloomers are beginning to make a show, like the sedums and mums. Crabgrass has multiplied like crazy during this unusually-wet summer, and it's been just about impossible to keep up with the weeding.

Sedums 'Neon' and 'autumn Joy'

Chrisanthemums

I guess it's time for me to get to work digging holes for all the new plants I bought this spring that summered on the porch and the deck in pots. Tomorrow is the fall Equinox, and I'll be painting Plein Air with a group of local artists at Shenandoah River State Park.

Tuesday, September 4, 2018

Working on a New Painting


Rhododendron maximum

 A couple of weeks ago I started on a painting of the native Rosebay Rhododendron (Rhododendron maximum) flowers that I'd planned for some time. This tree-sized Rhododendron flowers late in the year, from mid-June to as late as July, depending on the location and exposure. The photo above is my specimen, and it was taken during a trip to Mountain Lake Biological Station a few years back. I had been saving this image, with a few other supplementary ones, until I had some time to develop a painting.

I "edit" my photos whenever possible so that the composition is already close to what I want--in this case, a branch with two lovely flower clusters. The problem here was that there was another branch crossing  the focal one, which had to be "edited" out in the drawing. After the usual steps of drawing and transferring the line drawing to the watercolor paper, I was ready to start laying in some color.

Step 1

I began with some pale washes of lavender on the central cluster to articulate the form of the flowers, and after that was dry, put in the touches of pink. The buds of this plant are tinted a beautiful, pure pink at the tip, which fade to a pale pink, or even white, after the flowers open. After the flowers were dry, I added the characteristic dots on the petals, and the darks of the bud scales behind, to define the outlines of the petals.

Step 2

Then I repeated the same process with the second flower cluster. This one shows more of the unopened bud covered with their orangey scales. Once this was done, it was time to start on the leaves. The leaves of this Rhododendron have a dull shine, but they still have some blue reflections from the sky. I started with a wash of light blue and a bit of yellow-green for the main vein and let it dry. Rewetting  one half of the leaf, I then began to fill in the leaf with dark green, lifting portions of the wash to suggest the shape and the veins.

Step 3

The leaf  was not very successful, so I re-wet it and lifted more color for better balance. After it dried again, I added touches of deeper green here and there to bring out the veins. This process was repeated for each leaf except the one on the right, where the underside of the leaf shows--the color of the underside is yellower and has no shine.

Step 4

Step 5

After the leaves were complete, and the woody stem, the flowers appeared too pale in comparison, and my composition seemed to have a "hole" at the top of the focal cluster. I added two unopened buds for a bit more interest, but the flowers still need something more to punch them up. I'm in the process of using colored pencils on the flowers (light gray and sepia) to try to define and bring out the edges more. I'll post the finished piece soon.