Saturday, August 20, 2022

Painting a Pumpkin

Pumpkin 'Galeux d'Eysines' watercolor, 14.5" h x 21"w.


I've been working on a painting of this variety of pumpkin since last fall, for a show "The Botanical Gourmet" that I've been planning for the Botanical Art Society of the National Capital Region (BASNCR) this coming November. My painting started out as just the ripe pumpkin, but eventually, it became more and more involved. In order to tell the story of this particular pumpkin, I felt that I needed to show more of the vine that produces this lovely, warty pumpkin, as well as what its interior holds.

What follows is the gradual progression of steps that it took to get the painting to its finish.


Galeux d'Eysines pumpkin - Stage 1


The first stage was completed in late November or early December of 2021. I then cut the pumpkin, saved one piece, and cooked the rest. The pumpkin had sat around on my drawing table for way too long, and being so old, it was not very palatable--I used some to make pumpkin bread, so that it could be tastier.


Galeux d'Eysines pumpkin - Stage 2


I worked on the second stage through January of this year, as quickly as possible, since the cut piece was decaying rapidly. At this point, I decided the painting needed something more, to tie in the two elements of the composition--one way to make it more dynamic would be to add the vine and depict the leaves and flowers of Galeux d'Eysines. I looked on-line for photos that I might be able to use, but found none--the only way to really study the leaves and flowers would be to grow the pumpkin myself. 

I could have saved some of the seeds from the pumpkin I had and planted them, but open-pollinated pumpkins from the field might not yield the same exact variety that I was looking for. It was wiser to buy some seeds that were sure to be the pure Galeux d'Eysines strain. I found that Johnny's Seeds offered some, and I ordered them.

Waiting until after the last frost, I planted my pumpkin seeds in a grow bag, and they sprouted within a week. It has been fascinating to see the process: the vine growing and flowering, observing the differences between the male and female flowers. The male flowers seem to outnumber the female by about a twelve to one ratio--nature allocates its resources wisely, so that the plant will invest most of its energy into producing fruit and seed.


Galeux d'Eysines pumpkin - Stage 3


As soon as my pumpkin vine had enough leaves and some male flowers, I began sketching them. I laid tracing paper over my painting and drew in the vine with leaves and male flowers, weaving these along lines that would move the eye across the painting.


Galeux d'Eysines pumpkin - Stage 4


 After painting the upper vine, flowers and growing tip, I needed to find a way to bring the eye down and around the pumpkin and the cut piece, and had to take a bold step--to cut into an already painted segment of both in order to insert a piece of vine with a leaf in between these two main elements. This took a lot of lifting and scrubbing, to remove the color underneath. I was not able to remove all of the color, but hoped to be able to paint over it enough to not be too noticeable.

Once this was done, I had to wait another couple of weeks for a female flower to come along. The first one appeared on the vine during a very hot spell, and dried up before it had a chance to develop, so I waited for another one.

Eventually, one female flower developed sufficiently to open. I took photos of both the bud and the next day, the flower--these flowers only last one day. A few days later, the pumpkin began to grow larger, indicating it had been pollinated.


Female flower bud
Female flower opens

Pumpkin begins to grow.

It was so exciting to see this fascinating process take place from day to day! But about a week later, I noticed that the little pumpkin was not growing, and when I went to check, saw that the vine stem had been chewed--squash borers had pierced the stem! Very disappointed, I opened up the stem to clean out any larva feeding there, and buried the part of the stem that had not been eaten, trying to get the vine to re-root.

It was too late to save that portion of the vine with the tiny pumpkin, but it seems the borers didn't get to the main stem of my vine, so I may yet have a chance to grow another pumpkin before the end of the season. But, in any case, I had all the pieces I needed to complete my painting, which you see here.


Galeux d'Eysines Pumpkin, finished painting.


The last step was to add some subtle shadows to let the pumpkin and the cut piece "sit" on the ground. This has probably been one of the most complex compositions I've done so far, involving so many different processes, requiring both gardening and artistic skills, and lots of patience!

Wednesday, August 10, 2022

Meeting Mushrooms

Charlie Aller leading the mushroom identification class.


Last Sunday I drove down to Covesville, VA for a mushroom identification class "Basic Skills for Meeting Mushrooms," led by local mycologist Charlie Aller. We met at Hechyion Orchards on a hot and sunny morning. After a brief intro on how and where mushrooms grow, the different forms and shapes of the amazing fungi family, and the substrates upon which they grow, we set out to find some on the forested hillsides of the farm.


Turkeytail mushrooms (Trametes versicolor)
Medicinal mushrooms growing on a fallen log.

Our first finds were two groups of bracket fungi growing on fallen logs. We had discussed that one of the main distinguishing characteristics of mushrooms that holds clues to their species is that one group grows on wood, and another group on soil as a substrate. This is the medium in which the mushroom mycelium grows--the mushrooms themselves are actually the fruiting bodies of this thread-like structure that breaks down the organic material in the wood or soil with the help of bacteria and enzymes.

The turkey tail mushroom (Trametes  versicolor) has bands of different colors, and is a common sight in forests. These type of mushrooms are referred to as polypores. The other bracket fungi (which name escaped me) has been found to have medicinal properties.


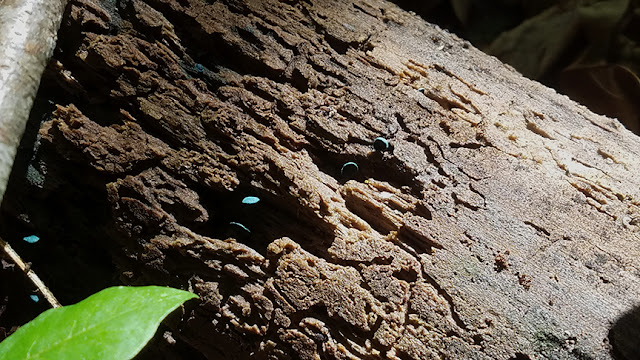
Green elfcup (Chlorociboria aeruginascens)

Green elfcup


An unusual fungi I'd never seen before was the green elfcup (Chlorociboria aeruginascens)--these tiny cups are a lovely blue-green and seldom fruit--the mycelium tends to stain the wood it colonizes, a phenomenon called spalting.


Golden Thread Cordyceps (Tolypocladium ophioglossoides)

Charlie digs for truffles under the Golden Thread Cordyceps.
Deer ruffle (Elaphomyces sp.) under Golden thread Cordyceps.

Another fascinating find was the Golden Thread Cordyceps (it's no longer classified in this genus), a darkish, club-headed fungus that has a gold-colored thread at its base, and parasitizes an inedible truffle called a deer truffle. Charlie dug under the Cordyceps to find a small truffle below, and slit it open, to show us the white spores inside.


Fungus parasitizing a beetle.

Speaking of parasitic fungi, Charlie also found what looked to me like a few fibers of ordinary mycelium growing on a pine log, but he spotted a beetle underneath it that was in the process of being consumed by this particular fungus. These types of fungi are known as entomopathogenic--nature is at times much stranger than we realize!


Cinnabar chanterelle (Cantharellus cinnabarinus)

I've seen these tiny orange-colored mushrooms before, and was surprised to learn that they were
Cinnabar chanterelles--they are edible, but according to Charlie, not the tastiest of the chanterelles, and so tiny they are hardly worth collecting. Unfortunately, we didn't come across any chanterelles of eating size. One has to look out for false chanterelles, which look very similar to the real ones, but are poisonous.


Reishi mushrooms on a trunk (Ganoderma lucidum)

As we worked our way up a hill, our next finds were some very large Reishi mushrooms growing on an old oak at the top. Charlie could observe the spores being released under the caps. Someone brought an orange-capped mushroom they'd found, which he identified as an Amanita flavoconia (in Charlie's hand in the first photo on this post), AKA yellow patches mushroom.


Giant Coker's Amanita (Amanita cokeri)

One lady found this giant classic-shaped mushroom, Coker's Amanita, on the hill. I learned that there are a few members of the Amanita genus that are edible, though most are poisonous, some deadly. Charlie explained that the danger with toxic mushrooms is that not only will they cause a lot of intestinal distress when ingested, but when the chemical compounds in these reach the liver, the liver converts them into an even more toxic form of chemicals that can cause organ failure very quickly. There are a few antidotes, but he emphasized that no one should ever eat a mushroom they've not identified correctly. Even then some people can have allergic reactions to normally edible mushrooms, so it's wise to eat only a little the first time, to test it on yourself.


Violet-grey bolete (Tylopilus plumbeoviolaceus)

There were a few other mushrooms found, but the last one I photographed was this beautiful specimen of the violet-grey bolete--such a lovely color! It's not edible, though, it's very bitter. It was getting very hot and we were well past the time allotted when our sweaty group finally headed back to the farm for a wrap-up. Charlie answered more questions and announced the following weekend's workshop on growing mushrooms. Much as I would have loved to do this one, after two Sundays with a lot of driving, I really am not up to making the drive there one more time--maybe next year.


Pencil sketches of my mushroom specimens.


I was able to bring home a few specimens so that I could depict them later on. I did this colored pencil drawing of these two the next day when I was fresher. The Reishi mushroom specimen is fascinating because it has a lateral stem--most from this variety grow stemless, directly on the tree trunks, but they can also have this form. I love the colors of both mushrooms, which are so evanescent. 

Now that I know a bit more about mushrooms, I plan to do some of my own mushroom forays closer to home to see what I can find--stay tuned!


Saturday, July 30, 2022

The Fullness of the Season

Herb's bed in July


The fullness of the season manifests itself at the height of summer, and the sequence of bloom in my garden hasn't slowed down despite the heat. Herb's bed is so colorful with the red Crocosmias, blue Centaurea, and blazing meadow stars! Several monarch butterflies showed up during the peak of bloom of the blazing meadow star (Liatris ligulistylis)--that's the most monarchs I've seen in my back yard in the decade that we've lived here. 


Monarch butterfly nectaring on Liatris
Monarch butterfly


The monarchs flying about the garden performing their mating dances with consummate grace made for a beautiful sight! The humming birds too have been enjoying the flowers, though they have proved much more camera-shy than the butterflies. The other evening Herb and I were standing on our front porch when a tiny humming bird approached and flew within a foot of our faces--it was a female checking us out. Deciding we were probably not dangerous, she went about her business of sipping nectar from the few fragrant petunias and other plants along the front walk. The tropical salvias, one of the hummingbirds' favorites, haven't been very floriferous thus far, so there's not much to nourish them at the moment.


Coneflowers (Echinacea hybrids) and bee balm in the back bed.

Bottlebrush buckeye (Aesculus parviflora)
The back bed with Buddleia lindleyana in front

The display of coneflowers in the back bed becomes more colorful every year as the plants multiply. The bottlebrush buckeye (Aesculus parviflora), another pollinator favorite, is looking better than ever; each year it expands further into its corner of the back yard.


Bush Clematis 'New Love'

I was determined to not let the deer eat my shrub Clematis this year, and covered it with garlic spray. The spray doesn't seem to deter the deer when it comes to other tastier plants like my roses, unfortunately. 


Joe Pye weed 'Baby Joe'

Hydrangea 'Tiny Tuff Stuff' with Gladiolus

Vitex agnus castus on the right.

Along the east garden, the hydrangeas have fared better with a bit more rain this year than last summer. The other hydrangeas near the house are about finished blooming, except for the variety 'Tiny Tuff Stuff' above. The Vitex shrub is displaying its purple flowers that look like a summer-blooming lilac.


Caladiums on the porch

This spring I bought an assortment of Caladium bulbs for the porch which are doing very well--love the different colors and patterns! These remind me of the shady patios of the houses in Cuba during my childhood.


Hanging basket on porch
 

The hanging baskets on the porch haven't been as successful--I'd envisioned the baskets lush with tiny tomatoes, herbs and flowers by this time, but the Nasturtiums (they have edible flowers) have grown way too much and the flowers and herbs not enough. The one above is the better looking of the two, but the plants still haven't grown enough to cover the coconut fiber of the containers.

A couple of weeks ago I noticed several of my arborvitae--the two flanking the house and one of the "Little Indians" were dying back and discovered that they were heavily infested with bagworms--I've never seen such a concentration of these insects before!

The two arborvitae flanking the house are huge--about twelve to thirteen feet high--an impossible job for Herb and I to tackle. I was fortunate to find an arborist in the area who came to spray for the bagworms right away. I hope the problem has been taken care of in time to help the trees survive!


Male pumpkin flowers
More male pumpkin flowers

This summer I've been growing an heirloom pumpkin vine, 'Galeaux d'Eysines,' in order to see what the vine and flowers looked like. I wanted to add these to my painting of the pumpkin that I started last fall. It's fascinating to learn that pumpkins have male and female flowers, and that although they appear similar on the surface, they are easily distinguishable: the males have one large structure in the center that carries the pollen, while the female buds have an ovary that looks like a tiny pumpkin at their base. Inside, the pistil divides into three lobes.


Female pumpkin flower bud

Female pumpkin flower

Pumpkin developing on the vine.

Nature always allocates its resources wisely, so the male flowers outnumber the females by a ratio of about ten or twelve to one--I expect to have maybe one to three mature pumpkins at the end of the growing season, unless something eats or finishes them off before harvest time. I'll be finished with my painting by then, and it would be nice to be able to taste the pumpkin--last fall when I bought the warty "peanut" pumpkin it took me a couple of months to paint it, and by that time the pumpkin wasn't very appetizing. I cooked it and used the pulp to bake some pumpkin bread, but it would be nice to be able to taste the flesh when it is fresh. I understand it's delicious!


My unfinished painting of the Galeaux d'Eysines pumpkin.

Sunday, July 17, 2022

Korean Stewartia

Stewartia koreana, watercolor, 12"h x 10"w.


After seeing and sketching the American Stewartia ovata in Colonial Williamsburg I want to do a more formal painting of it later on. I thought painting another Stewartia would be a good way to practice for it, allowing me to study which pigments best render the colors accurately, and use lighting as a way of dramatizing the image.

I had taken photos and sketched the Korean Stewartia at Blandy Farm the week before I went to Williamsburg, and found one photo with glints of sunlight that I particularly liked. I then used it as the model for this painting, which I plan to submit for Art at the Mill's fall show in October. 


Above is a photo of the painting in progress--I didn't take any other progress photos, just this one. As with any painting, the practice is a process in learning how to use the colors and shadows to model the objects to give a realistic sense of depth and three dimensions. I love the delicate texture of the creamy petals against the dark foliage, and feel better prepared for painting the native Stewartia ovata.

Friday, July 8, 2022

Blue-Tailed Skink in My Garden

Blue-Tailed Skink


Yesterday evening was beastly hot and humid, more so than usual, so I went out to water the plants on the porch and the potted plants that summer on my front walk. As I was walking back to turn off the hose, I noticed a small lizard on my front steps. I figured it was probably one of the many eastern fence lizards that live in my garden, but as I carefully stepped around it, the lizard turned to display the most beautiful bright blue tail. I realized that this must be a skink, a type of lizard that is common in Virginia.

Looking it up at the Virginia Herpetological Society website today, I learned that this is a common five-lined skink (Plestiodon fasciatus) and that all juveniles have blue tails. The website states:

"The function of the blue tail in this species has been studied by Cooper and Vitt (1985) and Vitt and Cooper (1986c). The blue tail of juveniles is an antipredator adaptation that serves to attract the predator away from the vulnerable part of the lizard, its body. Juveniles escape potential predators by disappearing into the leaf litter, lashing their tails back and forth above the leaves. The blue tail, contrasting with the brown background, attracts predators (birds and small, lizard-eating snakes) to the less vulnerable appendage. Once broken off, the tail twitches for a period of time, distracting the potential predator further. This increases the probability that a juvenile will survive to maturity. At onset of sexual maturity the tail color changes from blue to a cryptic gray-brown. This change occurs at a time when energy requirements for tail regeneration are also important to the growth and reproductive output of the adult (Vitt and Cooper, 1986c). Tail loss at this time decreases a female's ability to produce and brood eggs and a male's ability to win aggressive bouts with other males (and presumably to reproduce with the females in his area)."

 The skink was probably attracted to the moisture from watering, and came to check things out.


Hanging basket on porch.
 
Second hanging basket on porch.

This year I bought some side-planter containers for my front porch, and decided to "theme" them by planting mostly edible plants: one tomato plant in the center surrounded by trailing nasturtiums in assorted colors in the top portion, with herbs, coleus and petunias in the side holes. Thus far the nasturtiums are stubbornly refusing to trail, leaving the coconut fiber containers somewhat exposed. Not what I'd hoped, but who knows, they may yet be covered by the end of the summer? 


Flower of eggplant 'Tung Ping Long'
Eggplant

I'm growing more vegetables this summer, and as a botanical artist, I can't help noticing how lovely the flowers of some are, like this Asian eggplant. I tried growing these from seed a few years back with no success, so this spring I bought a couple of plants and a few fruits are starting to form, despite the plants being riddled with flea beetles.


Pumpkin 'Galeux d'Eysines' male flowers


I'm growing a pumpkin vine for the first time ever, in order to be able to add the leaves and flowers to my painting of the 'Galeaux d'Eysines' pumpkin that I started last fall. It's fascinating to learn that pumpkins bear both male and female flowers on the same vine. The male flowers are much larger and showier, and emerge about two weeks before the female flowers, but of course it's the female flower that will produce fruit. My vine is only now developing a few female buds. I hope some flowers will open before the deadline to submit my painting comes!


Coneflowers in the back bed.
Monarda 'Jacob Kline' with coneflowers.

My coneflowers continue to multiply and spread, making the back bed more colorful each summer. The red bee-balm (Monarda 'Jacob Kline') has finally grown enough to make a good display. I planted another one in a sunnier bed but this one seems to be doing better with a little more shade.


Crocosmia 'Lucifer'


 The Crocosmia 'Lucifer' is like a red beacon--I divided the bulbs and replanted them in a couple of other places like Herb's bed.


Blue Centaurea with red Crocosmia in Herb's bed.

Some of the flower seeds I planted this past spring didn't sprout (too dry I guess), and others seem to be taking forever to get going--I wonder if I'll get any flowers from them. But, a few rare seeds have recently sprouted: the two seeds of Florida Coontie I brought back from my trip there have finally emerged--it only took four months! 


 Coontie (Zamia integrifolia) sprout


And one of the Flamboyant (Delonix regia) seeds my friend Raquel sent just surfaced some months after planting--it's so wonderful to see!


Flamboyant seed emerging.

Flamboyant sprout on second day