Sunday, May 15, 2016

My first Vellum Painting

Slipper Orchid Paphiopedilum glaucophyllum on vellum, 12" x 9".

In April I had the opportunity to take a workshop with Carol Woodin at USBG on painting orchids on vellum. Painting on vellum was something I really wanted to learn--the techniques are very different from watercolor painting on paper. Since vellum can easily buckle with moisture, it's essential to apply the paints very dry, in thin layers, and build up the color gradually. I had read about this, but wasn't quite sure how dry the paint needs to be.

USBG brought out a group of lovely orchids from their collection for us to work from. I chose this delicate-looking Paph--Paphiopedilum glaucophyllum--for my painting. Many of the other orchids had wild colors: yellow, orange, magenta and purple, that were appealing but seemed too difficult to deal with.

Photo of Paphiopedilum glaucophyllum on my stand.

I struggled with the composition of my drawing, trying to give a sense of the winding stems and their bracts. I noticed that this species of Paph is of a type that has multiple flowers on one stem and a small bud could be seen beside the open flower  in front (most of the Paphs I've previously seen had only one flower per stem). The hairy spotted petals were one of the features that attracted me to this species.

Transferring the drawing to the vellum presented another problem--without a light table, it's very difficult to put graphite lightly on the back of the drawing and get much to go on the vellum, so one had to re-draw a good bit of the original drawing with the slim guidance given by barely-readable linework.

Once I started to apply the paint, putting an even wash with a dry brush was another challenge. Even more challenging was adding layers to the previous washed to build up the color--the slightest dampness tended to lift the previous layers to create "holes" or streaks that were hard to deal with.

Carol was very patient explaining how to repair these problems. Most of my classmates had a little more experience painting on vellum than I, and many obtained wonderful results with their pieces, bringing their expertise to bear on their particular orchids.

Paphiopedilum painting  on vellum by Cristina Baltayian

 The workshop breezed by very quickly, my piece is not quite finished but I managed to get enough on paper to give an idea of this specific orchid. I can see it's going to take a lot of practice for me to get these techniques down, and I hope to have the time to devote to it.

Paphiopedilum painting on vellum by Renee Johnson

Sunday, April 3, 2016

Japanese Umbrella Pine Sketches


State Champion Japanese Umbrella Pine (Sciadopytis verticillata), pencil sketch, 10" x 8"

Ahh, spring! Yesterday on the way back from delivering my three pieces for the Art at the Mill spring 2016 show in Millwood, I decided to stop by the Virginia State Arboretum on my way home. It was such a fine spring day, I took along my sketch book, pencils and camera, thinking to sketch the Japanese Umbrella Pine in the garden that is rated a state champion for its size. I've been studying the trees at the Arboretum with an eye to producing a painting to submit for the ASBA show next year, and the Japanese Umbrella Pine there is certainly an unusual and beautiful tree.

State Champion Japanese Umbrella Pine

Its "needles" are arranged in whorls around its stems that curve gracefully in a manner reminiscent of an umbrella's spokes, hence the common name. Looking it up on-line I found that the "needles" are actually cladodes, which are botanically classified as stems, but function as leaves. The tree is the sole representative of its family and genus, and a living fossil native of Japan, where it is associated with old Shinto temples and an emblem of the Imperial family.

It was introduced to western cultivation in the 1860's and grows very slowly. This state champion at the Arboretum was probably planted after Mr. Blandy's death in 1926, when Dr. Orland White took over as Director of the Blandy Experimental Farm and started collecting plants for the arboretum. Over the years this tree has been engulfed by other gigantic evergreens in the conifer garden so that this was the only unobstructed view of the mature tree that showed the trunk and structure of the branches. I sketched this while standing up and did a detail of one branch and a cladode from a nearby bench. I looked but couldn't find any cones on the tree or on the ground.

Younger Japanese Umbrella Pine at the VA State Arboretum, pencil sketch, 10" x 8"

I asked a gentleman at the gift shop if he knew where in the garden another specimen of this tree might be found, since the Blandy Experimental Farm website's "Map It" page listed two specimens on the grounds. Bill didn't know, but he was so kind as to find a smart phone and use the app to find the second one in a less-visited portion of the garden. He walked me there and helped me to move one of the garden benches closer so I could sit comfortably to sketch, thus earning my gratitude and friendship.

This second tree was much younger, and still had the classic pyramidal conifer shape. The strong breeze animated its branches, giving my sketch a very lively look. Happily occupied, it wasn't until my sketch was almost finished that I noticed it was getting chillier as the shadows became longer. I looked at my watch: it was five o'clock! Time to head home with a good afternoon's work.

Saturday, March 12, 2016

Out of the Box Botanicals

Big Cypress Box, oils on wood tobacco box, 5.25" x 4.5" x 4.5".

Preparing art for the upcoming BASNCR show, "Off the Beaten Path" has been fun, if a lot of hard work. The theme was to present botanical art that went beyond the traditional format to be "out of the box". The Big Cypress Box, a piece with five tiny oil paintings on a gessoed cigar box that I'd started many years ago (I can't recall exactly when but I think it was around 2001) and hadn't quite finished, seemed like a perfect piece for this show--botanical paintings literally on the outside of a box!  

Big Cypress Box: right side and rear panels.

Five miniature oil paintings of various plants and a butterfly native to Big Cypress appear on each of the sides: bromeliads (Tsillandia fasciculata) appear on the top and rear panel. Coral bean (Erythrina herbacea) is on the front panel, Florida's state butterfly, the zebra longwing (Heliconius charitonius) on the right hand side, and bald cypresses (Taxodium distychum) on the other.

Big Cypress Box: left side and front panels.

Decorative stripes in red, green and yellow outline the edges so that the design wraps around the box and creates the illusion that the paintings flow into each other. Next week I'll show you how the painting of "The Holly and the Ivy" I was working on back in December turned out.


Sunday, March 6, 2016

First Signs of Spring 2016

First Crocuses  of 2016 (Crocus tommasinianus)>

That harbinger of spring--the crocus--has begun to bloom in my yard. Today the first patch of Crocus tommasinianus planted two years ago, is finally putting on a show under the cherry tree in front. The early daffodils are also coming up.

White hyacinth buds (Hyacinthus orientalis).

My white hyacinths are also starting to show their buds--I'd almost forgotten where I planted them. It seems that we may yet have an early spring, provided we don't have any sudden cold snaps. The past two years spring has been so late in our area, a change would be very welcome.

Sunday, February 14, 2016

Plant Oddities

Indian Pipe (Monotropa uniflora) watercolor with colored pencil, 17" x 11.5".

I've been preparing works for BASNCR's exhibition at Strathmore Hall in June. The show is titled "Off the Beaten Path" and the idea is to present botanical art that is not quite in the traditional mold. "Out of the box," so to speak.

The Monotropa family of plants are certainly off the beaten path--most grow in old forests rich in mycorrhyzal fungi and are usually no taller than 6 - 8 inches--they would be easy to miss unless one is looking for them. I'm fascinated by these saprophytic plants (meaning lacking in chlorophyll) with scales that are modified leaves and tiny pendulous flowers that unfurl to become upright after they have been fertilized. I hope to eventually find and illustrate other members of this family.

Last summer came across another relative, Yellow Pinsesap (Monotropa hypopitys), growing at Pandapas Pond in southwestern Virginia, and have been working on an illustration of it. The first stage of my artwork in colored pencil is shown below.

Yellow Pinesap (Monotropa hypopytis), colored pencil, 12" x 10".

Sunday, February 7, 2016

Blizzard in Front Royal

Elena thigh-deep in snow.

Our driveway in the snow.

Everyone else posted their photos of the blizzard on FB long ago, but since I hate being the merchandise there (what reasonable person wouldn't?), I waited until I had time to post these few photos here on my blog. I brought my laptop home on Thursday evening in preparation for the blizzard starting on Friday.

The snow started right on schedule at noon, only about five inches had accumulated by dusk. It snowed all night and the photos above was taken around eleven the next morning. The snow finally tapered off on Saturday evening and a profound stillness descended upon our neighborhood.


Door to the back deck

The following morning I awoke to this lovely scene of winter wonderland. There were about 32 inches piled on our deck.

Looking over the back yard.

Looking over the back yard, the eleven Little Indians were buried deep in the snow, the boxwoods in front not quite visible. The nylon mesh barriers protecting my saplings from deer (which are 48" tall) were buried in the drifts to within a foot or so of the top.

Our front steps.

Nothing moved on Sunday, though Herb shoveled out the drive way. Monday around noon our HOA contractor plowed our neighborhood, but my office had Emailed to ask that we stay home until the parking lot of our building had been cleared. I didn't go in until Wednesday, and the side streets in northern Virginia had barely been cleared, most with only one lane open. Traffic was a nightmare for the rest of the week while VDOT contractors cleaned out the lanes. Thank heaven warm weather has followed and two weeks later now, only a few small patches of snow remain.

Sunday, January 17, 2016

A New Look for the New Year

White Phalaenopsis bud opens.

The company I work for "refreshed" our corporate graphics for the New Year. The presenters explained the concept of "refreshing" as opposed to "re-branding" thus: when a well-known brand such as the Holiday Inn decides to change the corporate logo and all of its associated graphics, it's known as "re-branding" in corporate-speak. If a corporation maintains its historic logo but updates the design a bit to make it look more contemporary, it's called "refreshing" the brand.

The Maza Studio Blog has been refreshed for the New Year with new colors and a new header background that I think suits the new botanical direction my adventures in art have been taking. I'm curious to know what my readers think of it, so please feel free to comment.

The orchids in my bathroom continue to bloom during the winter; above is the white Phal that is just opening a new spike. Below the Brassidium is repeating its performance of December, but with a  much smaller flowering spike.

This Brassidium flower just opened today.

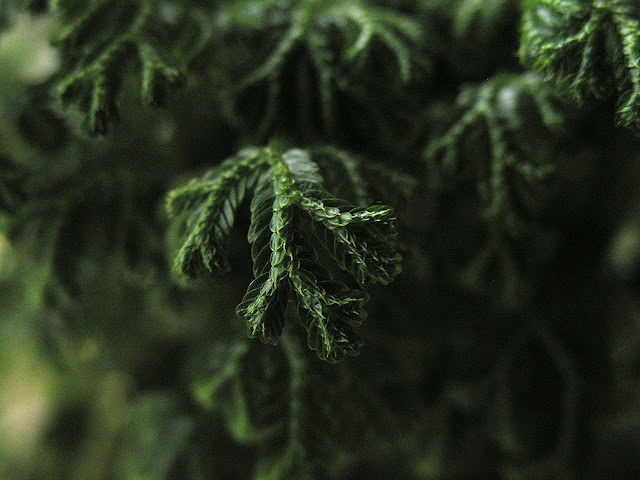
My latest acquisition for the bath was this delicate fern pictured below, Selaginella  krausiana variegatus seems to be a very popular houseplant innovation--I've seen it at several greenhouses in the area. I picked this one up at half-price. It's a gorgeous plant, though it requires very high humidity and watering every other day (in my house at least).

Frosty Fern (Selaginella krausiana variegatus)

This is a small fern of northern forests; in fact I remember seeing it growing at Dolly Sods last summer when we visited. The amazing complexity of its fronds can only be appreciated under magnification. Here are two shots using the macro setting of my camera, and they give some idea of the structure of leaflets, but to really appreciate its singular beauty you need the 10X that my hand loupe can give. I wish I had a camera that could photograph at microscope-type scale!

Close-up of Selaginella fronds.
Closer macro shot of Selaginella

Sunday, December 27, 2015

The Holly and the Ivy

Holly and Ivy, in color pencil (in progress)

The other day that lovely old English carol 'The Holly and the Ivy' was running through my mind while I was taking my lunchtime walk. I found myself on the grounds of the Hilton Hotel walking by a bushy variety of holly I often see used in landscaping, which had abundant clusters of red berries (probably some variety of Chinese holly, Ilex cornuta). Underneath, the ground cover around the parking lot was English Ivy (Hedera helix)--an aggressive grower that can be a plague for gardeners who do not want it.

I took a few cuttings of each with the idea of doing a seasonal-themed botanic painting and brought my cuttings home. I trimmed and arranged the sprigs in a container in my studio and have been working on a color pencil drawing of them as time allows. I used the Faber Castell watercolor pencils  in conjunction with the regular Faber Castell oil-based pencils I normally use, and it's interesting to see how the watercolor pencils behave as opposed to tube watercolor pigments. The watercolor pencil colors blend after water is applied, but some of the shading and texture of the color as it was put down can stay behind, giving interesting variations.

This is as far as I have got with it. There's still quite a bit of work to do making everything darker, particularly the greens.

Sunday, November 22, 2015

More Garden Additions

New tree: deciduous Magnolia 'Butterflies'


The fall weather has been so pleasant recently that it's allowed me to continue expanding my garden, while taking advantage of the great sales to be found at this time of the year when nurseries are trying to clear out all their stock.

Springtime Garden Center had two nice-size deciduous magnolias of a new variety named 'Butterflies' with yellow flowers, and it was impossible to resist. I'd been wanting a magnolia for some time, so I bought the best-looking one of the two and made arrangements to have them plant it for me, which they did this past week.

New boundary flower bed

During previous weekends I'd been working on consolidating the three plants I had at our eastern property boundary into one larger continuous bed. I put in one of the Japanese maple seedlings gleaned from the grounds of the office building next door to where I work. This will eventually shade the Rhododendron I had planted there a couple of years ago. I added two divisions of the Gazanias from another bed, a yellow-twig dogwood (Cornus sanguinea 'Artic Sun') and a Pieris shrub. The Silky Thread grass (Nassella tenuissima) that wasn't doing well in the back I transplanted here, adding a few bulbs of Blue Squill to fill it out. We'll see how this bed looks over the next year as the plants grow.

Gordlinia grandiflora

Beyond this bed I planted another irresistible bargain found at Wayside Gardens: Gordlinia grandiflora is a hyrbid of the famous Ben Franklin tree (Franklinia alatamaha) and the well-known Loblolly Bay (Gordonia lassianthus) of southern forests. Like the Franklinia, Gordlinia blooms in the fall as the foliage turns red, and it's supposed to be evergreen. We'll see if it lives up to that claim in these latitudes.

Bed with evergreens on east side of house (Gazanias in front)

I finally decided upon what I think is the right spot for the ferny-leaved cypress ( Chamaecyparis obtusa filicoides) I bought last spring. This meant moving the lovely dwarf blue spruce I'd planted under the bay window to the other side of the Golden Hinoki cypress, and moving the Floxglove that was there to another bed. Fortunately, herbaceous perennials are easy to transplant, and the spruce had only been growing for one season, but I think the combination of foliage colors looks better in the new arrangement.

Herb kids me about transplanting and moving plants so frequently, as if it was as easy as rearranging furniture, but it's really not that much different. If it improves the overall look and the plants were not prospering where they were, why not?

Front yard from the east, construction of new houses in the background

Sunday, November 15, 2015

Progress on Flame Azalea

Flame Azalea (Rhododendron calendulacea)

I've been working on the flame azalea painting during the past couple of months on off-hours from my fall-planting chores. I've concentrated on adding detail with color pencil to the focal point--the cluster of flowers on the center left--and creating a sense of depth in the overall composition. I also extended the small branch on the right so that the composition is now more horizontal and the focal point has moved more off-center. That wow factor is still eluding me, but it's getting there.

I put away my field sketches from Mountain Lake after I photographed them and have not been able to locate them since then, so I will probably start drawing the coral root orchid from my photos, since I want to get started on painting this strange native orchid before the end of the year.

Sunday, October 25, 2015

Another Growing Season Ends

Saffron crocus among strawberries.

Our first frost came last weekend, signalling the end of the growing season. On subsequent warmer days I was able to harvest a few more strawberries from the front bed and while I was poking about, found that the saffron crocuses I had given up on were starting to bloom! So far I've been able to gather about six flowers, and hope there will be a few more to season one or two dishes this winter. It seems hiding among the strawberries didn't hurt them at all.

Pencil drawing of saffron crocus.


Front yard in September
Front yard after the frost

These before and after photos of my front yard show how quickly everything goes from lush to drab after just one frost. It's been a good growing season--the wet early summer helped tremendously--all my trees and flowerbeds made progress, some more then others. The red maple on the west side gained several feet in height and about an inch in girth--I wish I'd taken photos a week or two earlier, when its foliage was fiery, and the narrow-leaf sunflowers by the house glorious.

West side garden

The Zelkova tree in behind suffered a great deal last winter with several major branches dying back. Let's hope this winter is not so severe and the tree can regain lost ground next year. This spring I planted a native witch hazel between the two, the small bush you see here. In time this will become a lovely under-story tree.

The Little Indians

The Little Indians bed (now eleven) continues to develop--the Amsonia in the rear is just beginning to turn gold and the Stella D'Oro daylilies in front are a bit larger. I'd hoped to widen the bed by another couple of feet this fall, but that can wait until next year.

New back yard bed

During the summer I planted a new Kousa dogwood near the miniature lilac Silvia had given me. I eventually joined the two mulched areas to form a new bed. Using the lazy method of newspaper mulch, I killed off the scrubby grass and have been putting in new plants here: a yellow lilac bush in the middle, a deep red hibiscus my neighbor gave me, a Clematis and lavender Bea gave me, an iris and a mum. It doesn't look like much right now, but hopefully, next year the plants will be fuller.

View of the back yard

Shady bed under the deck

The ferns under the deck are still struggling to get a foothold--the alkaline soil doesn't help. Lots of iron sulfate to acidify the soil hasn't made much difference so far. A Heartleaf Brunnera (B. macrophylla) was added this year; I'll keep working on it but it's a long ways from looking like much.

Backyard with ornamental trees

The back yard is still a fairly empty large space-- this year I added a native bottle-brush tree to the other small trees planted at the perimeter (tiny tree visible at left front). It will take a number of years before it attains its classic silhouette and lovely scented flowers. Behind it the Sevens Sons Flower Tree has sprung up to about five foot height and it bloomed lightly this summer. I've yet to see any showy red seed heads on it though--this is supposed to give the shrub two-season interest. The deer kept eating my trees back so I finally fenced in the dogwood and the crab apple--not very scenic but necessary until the trees grow tall enough to be out of the reach of the pesky critters.

I planted couple of new arbor vitae at the edge of our property, just behind where this photo was taken--one fast-growing Thuja 'Green Giant' and a Thuja 'Goldstrike,' with golden-tipped leaves. I'm hoping as these evergreens gain height, they will screen out the worst of the winter winds on this exposed hillside.

Front of the house.

There's still some time left for fall planting--I hope to dig in a few more trees and shrubs, and perhaps some spring-blooming bulbs in the coming weekends.

Sunday, October 4, 2015

Drawing in Color Workshop

Gnarly carrot and color pencil drawing together.

Two weeks ago I had the opportunity to take a workshop at the US Botanic Garden with renowned botanical artist Wendy Hollender. She was a wonderful instructor--one of those rare teachers who can verbalize her thought process while doing a demonstration, who really gets across the principles and ideas behind her work as well as the techniques.

There were fourteen of us students, most of us experienced artist members of BASNCR (Botanical Art Society of the National Capital Region). The theme of the workshop was roots, inspired by a fascinating ongoing exhibit the USBG has on this subject. Wendy brought a fabulous assortment of root vegetables grown on her farm in upstate NY: carrots, beets, turnips, parsnips, etc. all of which had a great deal of "character" as we artists like to say.

The first thing she asked was whether we knew what type of soil her farm has. As a gardener struggling to grow plants in Shenandoah Valley soils, I recognized the familiar twisting, contorted pattern of roots growing on very rocky soil right away and said so--my guess was correct.

I chose to draw this gnarly carrot for its intricate pattern of roots going off at all angles--it seemed to actually be a combination of five normal-size carrots with some tiny ones emerging here and there. My fellow students chose their vegetables, and we were instructed to start our life-size drawings with light graphite pencil, measuring and getting the proportions accurate.

Once we had drawn the basic outlines, Wendy showed us how she started toning the shapes with a dark sepia pencil to bring out the form, in effect creating a grissaille, and then adding a bit of color at the same time.

Wendy Hollender demonstrates technique.

Wendy's demo Day 1

She put down some color using watercolor pencils and applied a small amount of water with a "water brush" (a very clever brush with built-in water reservoir that saves one from having to carry a water container on site). The idea was to cover most of the grain of the paper, leaving only a bit a white for the highlights.

My electric pencil sharpener did not fit the Faber Castell watercolor pencils we were using, so I decided to try to stick to plain pencils for the most part.

Starting to add color to my early stage grissaille.

At the end of Day 1

Towards the end of the first day I had my drawing fairly filled in with color. I felt I was probably close to being finished. I voiced my fear of "going too far and ruining it," a feeling I think many of us share. This obviously struck a chord with others in the room.

Wendy's answer was, for me, the workshop's number one take-away. She said, "Most people take their drawing up to a point and then stop, thinking that's good enough. That's the point where you need to push yourself, to push your work to the limit. Keep pushing and pushing past the limit to see what happens."

That clicked with me--what were we all so afraid of? It's a drawing, after all, not a life and death struggle (though sometimes it may feel like that)--if it doesn't turn out well one can always start over. Wendy's insight is a life lesson one can apply to anything, not just art--all who succeed do so because they push themselves past the previous limits.

The next day started with renewed energy. It was time for me to work on getting the darks darker, for a full range of values on a scale of one to ten. Wendy had us do exercises on strips, toning small sections to create a 3-D impression of roundness. Some of the students had a difficult time understanding this, and she worked with them patiently, but insistently, until they got it right.

Wendy's sketches.

I tried out the watercolor pencils on the top stems of my carrot and found it an interesting way of covering the grain of the paper faster. I'll have to try more of this in the future once I get a sharpener that works with the thickness of these pencils. I used the Verithin black and dark brown pencils (quite hard compared to the Faber Castell), to darken and sharpen the edges, all to good effect. I used an ivory pencil to burnish in the colors.

By late afternoon my eyes weren't focusing and I was utterly exhausted--who'd imagine that drawing could be such hard work? I took a walk around the room to check our the other artists' works.

Workshop students' artwork

Wendy had demanded the best from each of us, and at the end of the day, when we all put up our drawings for display and a final critique, the transformation we had undergone was visible in each of the works.  I never knew I could achieve such results with color pencils! I wish all workshops could be like this one.